

How To Set Up A New Hp Desktop Computer
Z7_3054ICK0KGTE30AQO5O3KA30N0
hp-concentra-wrapper-portlet
![]() Actions
Actions
HP Desktop PCs - Setting Up Windows 10 for the Showtime Time
This certificate is for HP desktop computers with Windows x.
This document contains information about setting upwardly your calculator and configuring Windows x for the first fourth dimension. To set up your new computer, unpack the reckoner, turn information technology on, and and then complete the Windows 10 setup process.
Step ane: Unpacking the figurer
Unpack the computer and other items from the box.
warning:These procedures involve lifting heavy object(s). More than than one person should lift the heavy object keeping the object shut to the torso using leg muscles instead of dorsum muscles.
-
Unpack the monitor and tower, if is separate, from the box.
note:
Some computers have a separate tower and monitor; All-in-I computers have a monitor with a built-in reckoner.

-
Unpack the other items from the box.
-
Select a location for the reckoner that is near a power source.
-
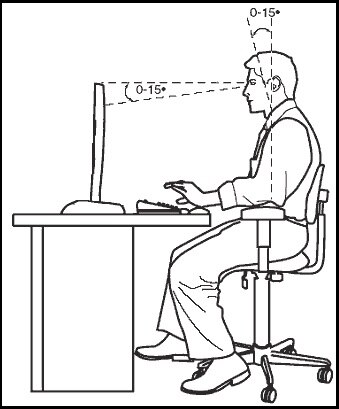
Adjust the display screen.
-
Conform the height of the screen so the entire viewing area is just below your middle height. The height and angle of the screen should not cause neck or back pain during prolonged viewing.
-
Conform the distance of the screen so your optics are at least ane meter (three feet) abroad and only slightly angled down.
-
Footstep two: Connecting the power string to the estimator
Connect the power cord to the computer and to a ability source.
-
Connect the ability string to the computer and to a wall outlet.
-
If the monitor and tower are separate, connect a second power string to the monitor and to a wall outlet.
-
If the monitor and tower are dissever, connect the computer to the monitor with the video cable.
notation:
Cables tin exist unsightly and should be hidden from view past routing them behind the back of the desk or between the desk and a wall.
Step 3: Connecting the mouse and keyboard to the figurer
Choose a department based on whether you have a wired or wireless mouse and keyboard.
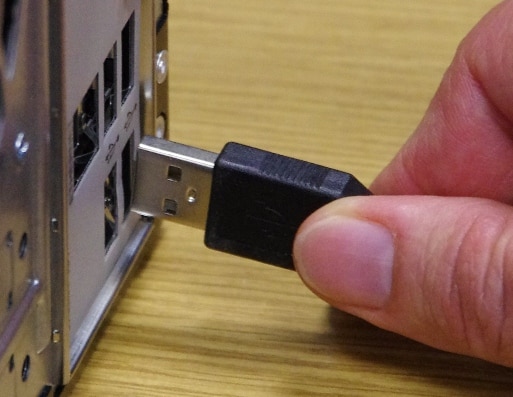
Connecting the wired mouse and keyboard
Plug the USB cables into the reckoner.
note:Use the USB ports on the back of the computer; this allows you to plug USB drives into the front end of the computer.
Connecting the wireless mouse and keyboard
Connect the wireless mouse, keyboard, and dongle to the computer.

-
Remove the tab from the battery compartment on the bottom of the mouse and the keyboard.

-
If the wireless mouse and keyboard come with an external dongle, plug the dongle into a USB port on the computer.
note:
Use the USB ports on the back of the computer; this allows you lot to plug USB drives into the front.

-
Brand certain the mouse and keyboard are within 100 cm (39 in) of the computer and on the same level surface.
-
Make certain the power switch for the mouse is set to the On position.
Step 4: Setting up Windows 10
Configure your preferences, connect to the Internet, and go started using the operating organization.
note:The personal digital assistant Cortana guides you lot through the process of setting upwardly Windows x, with the selection of using vox control instead of using your mouse to progress through setup. To adjust Cortana's volume, use the volume command icon
at the bottom right corner of the screen. To disable voice control and mute Cortana, click the microphone icon
at the lesser of the screen.
-
Press the power push button to turn on the computer. During the setup process, Windows x might accept a long time to procedure an item without visual feedback on the screen to signal progress. This is normal.
circumspection:
To avert damaging the data on the computer, practise not restart your computer during the setup process.
-
After the HP logo, the Let's start with region. Is this right? screen displays. Select your state or region from the listing, and then click Yes.
-
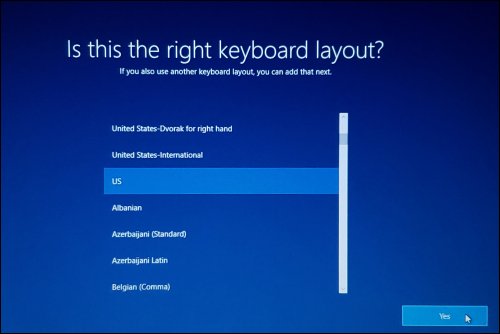
The Is this the right keyboard layout? screen displays. Select the desired keyboard layout, and then click Yeah.
-
On the Do you lot want to add a 2nd keyboard layout? screen, you can either follow the instructions for calculation some other keyboard layout or click Skip.
-
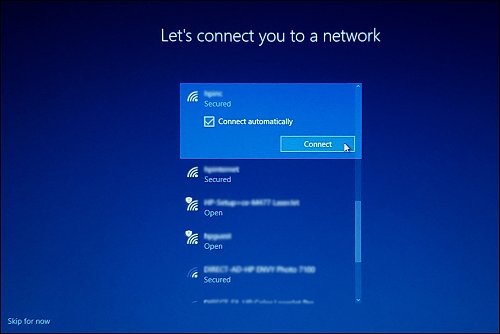
On the Let's connect you to a network screen, select from the available networks, type in your user name and password if necessary, and then click Connect.
-
After a few introductory setup screens that require no action, the Windows x License Agreement screen displays. Subsequently reading the license agreement, to proceed, click Accept to proceed.

-
After the license agreement, the Sign in with Microsoft screen displays. Sign in with your Microsoft account or click Create account and follow the prompts to create a new Microsoft account.

-
Afterward signing in the following setup screens brandish. Follow the on-screen instructions to customize Windows.
-
Link your Android or iPhone to this PC
-
Protect your files with OneDrive
-
Gear up your Role
-
Brand Cortana your personal assistant?
-
Do more across devices with activeness history
-
Choose privacy settings for your device
-
-
On the registration screen, blazon your personal information, and so click Side by side.

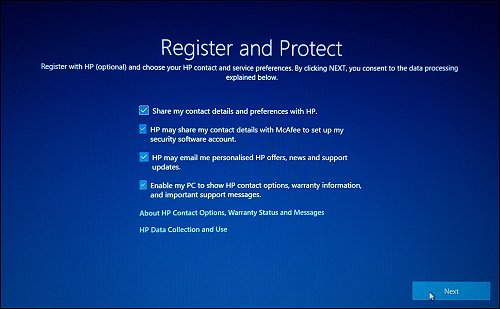
On the Register and Protect screen, select your preferred privacy settings, then click Next.
-
Read whatever introductory screens describing the features of your figurer, make selections when prompted, and and so click Adjacent upwardly on completing each.
Yous are at present done with the initial setup process.
Step 5: Changing the Date and Time settings
Adjust the date and time on your computer.
-
In the bottom-right corner of the screen, notice the date and time.

-
If the date and time are wrong, proceed with these instructions.
-
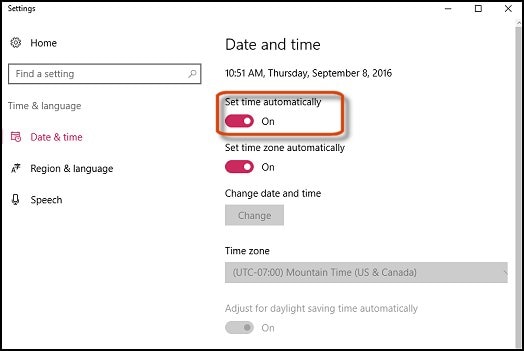
To change the date and fourth dimension, in Windows search for Date. In the results, click Date & time settings.

-
Move the Set time automatically slider to Off. And so, under Change date and time, click Alter.
note:
Past default, the Set fourth dimension automatically slider is set to On. If the computer is not connected to the Internet, the engagement and fourth dimension might be incorrect.

-
Adjust the engagement and time as needed, then click Change.

-
If the computer is connected to the Internet, motion the Prepare time automatically slider to On.
Step 6: Things to do subsequently setup
Congratulations! Y'all accept successfully gear up Windows 10. HP recommends you lot open HP Support Assistant and browse for updates.
HP Back up Assistant scans your computer and automatically detects and installs the latest software and drivers available from HP. For more information on how to download and use HP Back up Assistant, see Using HP Support Assistant (Windows x, 8, seven).

How To Set Up A New Hp Desktop Computer,
Source: https://support.hp.com/id-en/document/c04941742
Posted by: kochpockina.blogspot.com
0 Response to "How To Set Up A New Hp Desktop Computer"
Post a Comment